 |
|
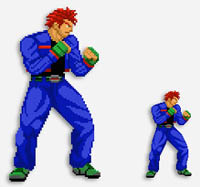
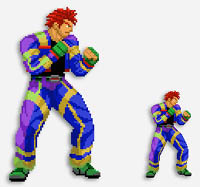
After learning a bit about palettes in Mugen and how important working with them is, I kind of figured out that you can play around with your graphics to use the palette to your advantage. In this tutorial, I propose that you can have a character with two costume designs without the extra sprites. Now, I am sure that this has been done before but I don't think it has been done in such a purposeful way. Before we start, I assume that you have a decent understanding of Photoshop and indexed colours so I won't be explaining things too much in depth. Below, a sample of a simply coloured sprite. It's one of my own sprites.... Nah, just kidding! This sprite belongs to Dark Dez (Don't sue me!) but I'm going to mutilate it anyway.
|
|
It can seem a bit flat so I added some small designs.
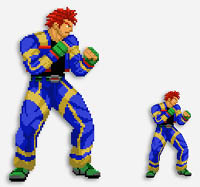
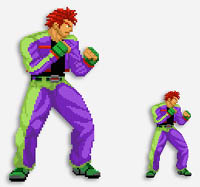
He looks OK but just say that I want a different design like below.
|
|
You are probably wondering how the hell you can have both designs then.... Well, it's not as hard as you think. The key here is to use unique colours as your original working palette but, for the final game palettes, you set the colours so that you get the right blend. The only drawback is that you have to double the colours in your palette for the alternate designs. |
|
And this is how we get the whole thing working.... 1) Get your original sprite with the first design.
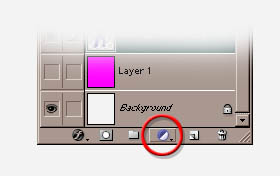
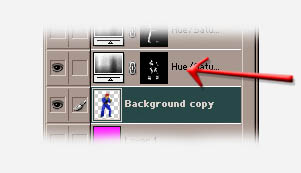
Now instead of recolouring the sprite to the second design, click on the little adjustment layer icon in your layer palette and select "hue/saturation".
2) The hue/saturation window should pop up now. Play with the hue slider until you get some weird colours that would contrast your original colours. Don't worry about what they are because they are just for reference at the moment. Click "OK" when you are done. |
|
3) Now select the pencil tool and draw on the hue/saturation layer the second design for your character.
4) If this gets too confusing then add a copy of the sprite with just the single colour, draw the second design using the hue saturation layer then just turn off the single colour layer so the final sprite gets affected properly.
|
|
5) Warning: be very careful when recolouring because you only want to paint on the colours which will be changing. For example, if you paint over an extra pixel of skin (without the intention of having the skin be an extra colour) and you don't notice, you may end up with an extra unnecessary colour in your palette. |
|
6) Once you have your sprite done, you use all the colours to make your palette. Here it is important that you have unique colours so that when you make your palette, the colours don't mix unnecessarily with other colours. save a flattened copy of your sprite and convert it into an indexed color image (IE 256 colours). |
|
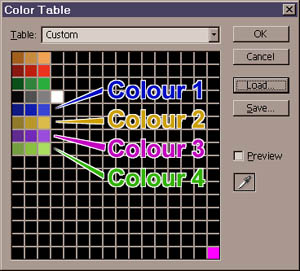
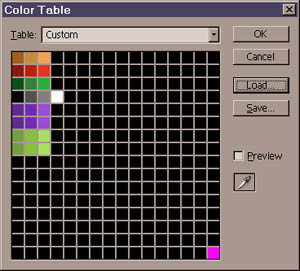
7) Once you have a palette saved (color table option in Photoshop), we can start to work with the it so that you can have your two designs. Firstly, though, we have to reference each colour and their position in the palette (Notice that I have set up the palette vertically so it is easier to work with). I've done this below:
|
|
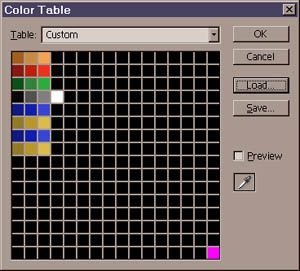
8) Now, load up your flattened GIF sprite (or PCX) and go into the color table option in Photoshop (Image > Mode > Color Table). 9) Load up the palette you made. For the first design, we have to change colours 3 and 4 to match colours 1 and 2. So, change colour 3 so that it uses the same colours as colour 1. Then change colour 4 so it uses the same colours as colour 2. When you are done, save out this palette under a diferent name. This should now give you your first design.
|
|
10) Cancel the colour changes so they are back to their original messy 4 colours and reload the original working palette. Again, go into color table and change the colours. This time, however, change colour 1 to match colour 4 and colour 2 to match colour 3. Save this palette out. Note: I realise that these colours are ugly but I kept them this way just to make things clear.
|
|
11) Now, when you use the character you create in Mugen, you have your two designs for the price of one. Please note that in order to change the colours, change the palette afterwards and don't fiddle with the sprites themselves or you could end up with a number of headaches in the end. Anyway, enjoy!
- Revanto - PS: A big thanks goes out to Dark Dez
for the use of his sprites for this and many other of my tutorials. |