![]()
Personally, if I were to make a tornado effect for my character, I would use a 3d program. However, just so I can be a little diverse, I will provide a little Photoshop version for you. But, I should warn you that it might not look as great as it can be. I'm sure that if you experiment that you can make something better.
Well, I'll give it a go anyway.
1) We start off by creating a 300 by 300 canvas filled with black.We are going a bit extra this time because we will be trimming the sprites in the end.

2) Create a new layer and, with the selection tool, select about a third of the width of the canvas. Fill this with white. It doesn't have to be perfect, just roughly this size.

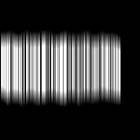
3) Then select Filter > Noise > Add Noise to give it some dark speckles.

4) Use the single column selection tool and select a column somewhere in the speckled area.

5) Now use the transform tool (Ctrl + t) and stretch it out until you get som nice streaks.
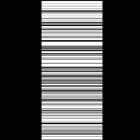
6) At this point, you will want some roughness around the edges so get the eraser brush and erase the sides a bit for a little roughness.
7) Now, go into Filter > Blur > Motion Blur. Set it and 0 degrees and give it a nice pixel value for smooth edges.
8) This will be your basic tornado layer. If you want, keep a spare copy of this layer.
Now, we are only going to make this tornado 4 frames so we make 3 copies of this frame and rename them all numerically (EG Layer "1", Layer "2", etc...)
9) Pick layer "2" then select Filter > Other > Offset and set it to: Horizontal = 0 pixels and Vertical = -75 pixels.
We use 75 pixels because we are making four frames and 75 is 1/4 of 300.
Then pick layer "3" and offset twice.
Finally, offset layer 4 three times.
10) For the next part, we need to work sideways but before we do this, we need to create a new layer above all the tornado frames. So, create the new layer and name it "block".
Select a small chunk at the bottom of the layer and fill it with black.
11) Now, we want to rotate the canvas so select Image > Rotate Canvas > 90 degrees CCW.

12) Before we do any deforming, however, we need to create new frames. But, first, set all the opacities for the tornado layers to screen.

13) Now make copies of all 4 of your tornado layers and place them under each respective layer. Set these second sets to 50% opacity and rename them each with a suffix "b". Below is an example of how your layer hiearchy should look.
Layer: Block
Layer: 4
Layer: 4b (at 50% opacity)
Layer: 3
Layer: 3b (at 50% opacity)
Layer: 2
Layer: 2b (at 50% opacity)
Layer: 1
Layer: 1b (at 50% opacity)
Background
14) Finally, before we start, select all the "b" layers and flip them all horizontally (IE select all then Edit > Transform > Flip Horizontal). These "b" layers will be the rear of our tornado for each frame.
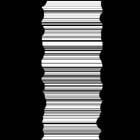
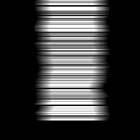
15) Now, comes the deforming. First, turn off all the layers except layer "1" and the background. Then select Filter > Distort > Shear.

Basically, you just want a little curve to your tornado like with the settings above. Make sure that you have "wrap around selected.

16) Now, use the same shear distortion for ALL of the rest of your frames including the "block" layer.
If you just turn on layer "1" and the "block" layer then you should have something that looks like this:
17) I'm sure you are starting to see where this is going...
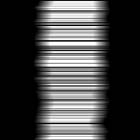
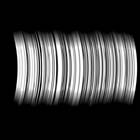
Now, just turn on layer "1", "block" and the background. Pick layer "1" and then select Filter > Distort > Shear again but this time with different settings.

This distortion will give us a little angle to the tornado gusts. Once you have done this, use the same shear settings for ALL the other layers.
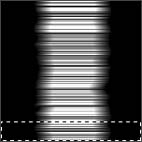
18) Now, when you look at just layer "1" and the "block" layer turned on, you will notice that the "block" layer is screwed up.
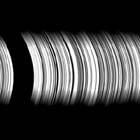
Don't worry, this can easily be fixed. Just offset the layer to the right until it 'caps' the edges like so...

19) Now, we are almost done. First, pick your "block" layer and go to Select > Load Selection then press 'OK'. Then invert the selection (Ctrl + Shift + i).
Then go to all the tornado frames and delete everything in the selection. So, layer "1" should now look like this:
20) Deselect and turn off the "block" layer.
Before we turn the canvas back around, we need to flip back all the "b" layers. However, because of the distortion, we will do something different. So, select each "b" layer then select Edit > Transform > Rotate 180 degrees.
Do this for the all the "b" layers.You might also want to move them slightly so they align better with the other layers. With just layer "1" and "1b" turned on, you should have something that looks like this.
21) Now all you need to do now is to select Image > Rotate Canvas > 90 degrees CW to set thing right. Once you are done, make flattened versions of each frame.


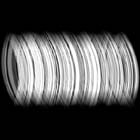
OK, so it is not a perfect tornado but at least you get the gist of how you can approach it.
Oh, and be careful because, as I am writing this tutorial, I realised that I made a mistake and frames 1, 3 and 4 are the same (I forgot to offset layers "3" and "4" properly). Caution: when you use this technique, don't miss a step :(
| Now let's at what some of the PS filters can do... |
|