| There are many ways of creating special FX for Mugen. You can use a paint program (EG Photoshop), a 3d program (EG Lightwave) or even a vector program (EG Flash). In this tutorial, I hope to show you how easy they are to make using photoshop. Thanks to Dark Dez for contributing his sprite. Thanks to Madness for the noting the 'screen/linear dodge' error. |
|
1) First thing you need is your sprite in a Photoshop file. It's good to have a small chunk of background from a game or something so you can see the FX later when they are glowing. I've darkened the background so you can get a clearer viewof the glow effect.
|

|
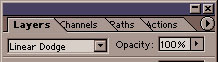
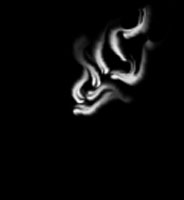
2) Create a new layer and fill it with black. Before you start drawing, set the layer to "linear dodge". Start drawing your glowing object with white colour.
- It's important that we start off working in black and white as it will be easier to work with later. Also, don't worry about number of colours either because we'll fix that later, too. - Also, don't use the eraser. If you want to erase something, just change your paint colour to black and paint as if you were erasing. - The key to getting an idea of how it will look is to remember that the lighter something is, the more it will show up. So, white (or lighter colours) you will see but black (or darker colours) will become transparent. |

|
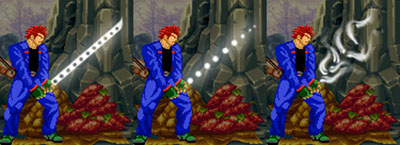
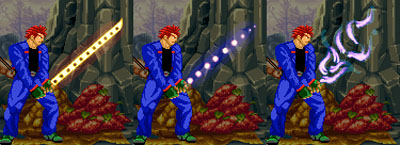
3) As you can see, I've made 3 different sword samples... (OK, one is not a sword).
|
|
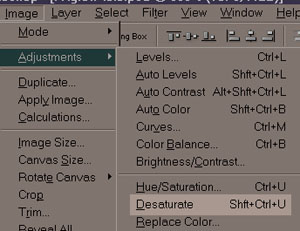
4) Now this is where we make magic. First, to ensure that the layer is in greyscale, go to 'Image -> Adjustments -> Desaturate'. This will remove all colour information from the layer you are on. If you make any future changes like blurring, smearing or whatever, don't forget to desaturate afterwards because sometimes colour just seems to pop up occasionally.
|
|
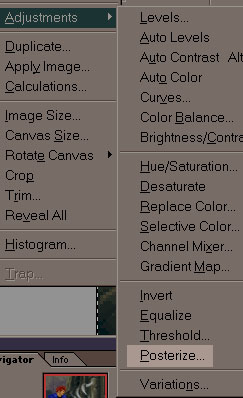
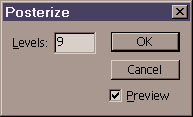
5) It is good to keep a spare of this layer so copy it to a new layer and go to 'Image -> Adjustments -> Posterize'. What this does is create a poster-like look by limiting the level of shading. We need to do this so that you can match the number of colours you have reserved for the FX. Once you have the little pop-up windows, pick the number of colours plus one. So if you have 8 colours reserved for the FX, set the number to 9. This will allow you to have the background transparent colour as well.
|
|
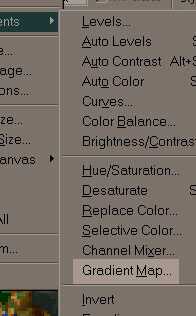
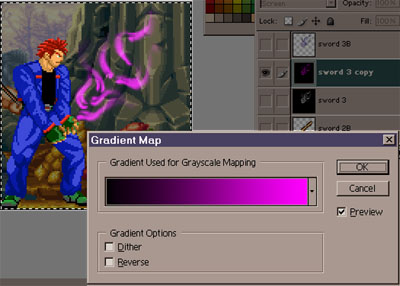
6) This next bit requires a wonderful tool in Photoshop called "Gradient Map" that uses a gradient to colour stuff based on light and dark values. Go to 'Image -> Adjustments -> Gradient Map'. This should bring up a window with a gradient and you should also notice that your greyscale FX layer has been coloured. We need to change this colouring to what we want.
|
|
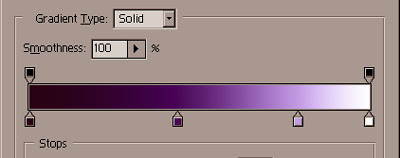
7) So, click on the gradient bar which should bring up the gradient editor. Below is an image of one gradient I use. You need to make the end colour black (make sure it is the right end) so that the dark bits are transparent. Play around with the colours until you get something that looks right.
|
|
8) Once you are happy with the look, click 'ok' and 'ok' again. And done!
|
|
9) Now you'll want to convert things to a normal sprite so change the FX layer back to 'normal'. Select the magic wand tool and set it to '0' tolerance and turn off 'anti-aliasing'. Click on the 'outside' colour of your sprite (like below). (You might want to pick 'select -> similar' to make sure that the colour is completely selected.) Then fill it with bright green or whatever colour you use as your sprite transparency.
|

|
10) All you need to do now is to copy it out to a new canvas and save it as a GIF - I find it easier to do all your effects on one big sprite sheet. That way you can see how everything looks and it saves you repeating the process over and over again for each sprite. Before I go, I have a few things to say. Firstly, use as many tools as you can to cheat shaping your FX. Example: - Distort -> Polar Coordinates Also, experiment with the colours. You don't need to make FX with single colours. Mix blue with orange, green with gold, etc... That's why Gradient Map is a powerful tool. Although, some colours just won't work. Experiment and find out yourself. You can also layer two sets of sprites on top of each other in Mugen. So even if you have a limited FX palette, you can still add variety to your character. Finally, mixing non-additive FX (non-glowing FX) with glowing FX gives your character more flavour. Think of it, a futuristic sword with cool glowing neon designs! I hope this has inspired you to create some awesome FX. Have fun! Revanto |